
Paradise ain't cheap!
My Daddy handed me this piece of wood yesterday and asked me to paint Paradise ain't Cheap on it for his tikibar. The funny thing is his house is up for sale!! LOL
Gotta love his "Staging" idea!
I've been asked before about free-handing which is how I do most of my lettering. However, for those that struggle or don't like their penmanship, this is how you can achieve that perfect lettering!
Simply go into your Word program and write what you want to paint.
Now, choose the font and the size.
This font is 160 pixels
You will notice some font choices are larger than others.
Now, highlight the font and make it bold.
Print it out.
On the page below it only has the first 4 letters of the word Paradise. (so that'll give you and idea of the size)
If you have some graphite paper, place it under and copy.
If you don't have graphite you can use a ballpoint pen and press down hard to indent the wood.
WORKS GREAT!
Enjoy!


Finding the Treasure in a Trunk~
My latest project:
One of my most favorite childhood items that I cherished was a "Hope Chest" my mother bought me on my 13th birthday. It held lots of my drawings of a one day wedding dress I had drawn in Art Class! It also cherished love letters from Mr. Larry himself. After we married and began a family it was the "treasure chest" for collecting my childrens creations!
Unfortunately we lost it when our home burned years ago... :(
The flip side to that loss is it created in me a yearning to want to make something for each of my grandchildren that they too could treasure for years!
While shopping at a friends little boutique in Bowling Green, Ky
Junkyard Gypsies Home Consignment, I found this wonderful old trunk. It needed some work but I could just see Jaylen's books and toys filling it up! How excited I was to load this up and begin giving it a new life! The great part was it was only 15.00! Sadly, I don't have a before and after picture of it. :( But that started me on my next creation for all 4 granddaughters!
I do however have an after picture of Riley's trunk that I brought back to life! Her trunk only cost $10.00 at a local yard sale. I had everything else needed to create this in my crafting stash! No need to purchase anything!

Here is a look at what this latest craft looked like at the start...
on June 26, 2012.

Goo-Gone is amazing! I use it and then gently clean that area well with warm soapy water.

There is a little mold on the top so I sprayed with bleach water and let sit for a couple of hours

yep. that's my Pampered Chef spatula I'm using! lol....it works great!

I use latex outdoor paint for the base coat. This one took 3 coats. I don't sand these down. I like the aged look it gives.Once the paint is dry the real fun and personalizing begins!
stay tuned~~
here's an UPDATE!!!
Sunday, July 29th
I set aside some time today to work on Miss Zoey's trunk and I'm loving the colors! Too cute! They go with the colors in her bedroom.

Items needed to do this step: Modge Podge, Ribbon, Stickers, Scrapbook Paper, Stiff Brushes, Chipboard Letters.
This area takes a few minutes: I like to gently tear the paper to give it an older look, I'll distress it later.
Lay you paper where you want it when your satisfied, simply begin gluing each piece down. Be careful because cardstock isn't real forgiving when you misplace it! You can use repositional tape if you have some on hand instead of gluing it.

and here's the top! See how easy!! You can finish the sides, paint them to match a rooms furniture or complete them as you did the top!

I'm just loving this one!
Awww....I've got to find more trunks!!
Just a little nightlight

This is the easiest thing in the world to make!! You can find the base at Hobby Lobby or Michael's.
The base runs around 8.00 but with a coupon you can get it for as little as 4.00! Add some material or some beads or ribbon to embellish the edges using Modge Podge and allow to dry. I went over mine with an extra coat to give it a slight sheen!
Allow to dry and you have a nifty nightlight in less than an hour!
From Trash to Treasure with Old English!


This was what I call a "gimme". A friend was going to toss it and I just couldn't let that happen! All it needed was a little TLC! I actually went around it with a dark brown sharpie marker and covered up any scuffs and then went over it completely with my old faithful Old English Wood Polish! This wood is brilliant and gorgeous! Besides, they don't make furniture like this now days!
TO MOM from the TWINS

THE FUN BOX

THE FUN BOX
This little Williams-Sonoma picnic basket was given to me as a gift filled with wine and a wonderful lunch many years ago! Seriously, I'm embarrassed to admit it but it had been well over 8 years since it was taken off the garage shelf and used next to the lake!
Anyhow, my granddaughter Jaylen was coming to stay the weekend and the one thing we always do is create crafts or bake. I walked into the garage looking for one of many stored craft projects. When suddenly the idea of making that poor picnic basket into a "Fun Box" popped into my brain. Most of the time these moments end up costing a few $$ but I'm proud to say this one cost not one penny!!
Everything we needed, we already had!
Without telling Jaylen my complete idea, I had her paint the outside brown and the top she painted a soft celery. After about 30 minutes of drying we painted on a coat of crackle paint with a foam brush. Once that dried I let her try her hands at applying the brown paint on top of the crackle glaze in long, thick broad strokes. She did an amazing job and she was simply thrilled to see the outcome. In fact, she wrote down what she did step by step in her journal without any encouragement from me! Smart cookie, eh?
The rest of the night included baking banana bread loaves to share with those that serve us throughout the year. You know, the mailman, girls in the office and her teacher.
I tell you I'm never excited to see her leave and go home. Yet, this one time I was so eager to finish this project it was driving me nuts!!
I dug through my scrap-booking boarders and chipboard letters to find just what I needed for the lid. Applied a little paint to the letters, allowed them to dry, then using Mod Podge I glued them to the topside. I tell ya, the moment they were applied that little basket came back to life! It had purpose all over again! I filled it with the craft kits I had stepped back to look at it. It was a great feeling of accomplishment but more-so of recycling something so old. I had treasured it as a picnic basket with the memories that it once held and now it will be a constant reminder of creating at MeMe's house!

When Jaylen saw it for the first time she said, "Oh WOW Meme, I love it"! Then suddenly she recalled that she had been the one that painted it weeks earlier! Now each time she arrives, sometimes even before I get my hug, she runs looking for the FUN BOX to see what's new inside.
The great thing is I can find simple things for just a few $$ at Michael's, Joann's, Walgreen's and especially Target!
Happy crafting & making memories with those little ones in your life!
bri~
C is for Crayon!

This is my first shot making a "Crayola Letter" for the girls playroom.
I wanted to share my first attempt to let you see my flaws..lol!
(It's not even at the bottom and you can see the glue string on the right)
Items needed:
11 x 16 Canvas
64 count box of crayons
piece of paper
tape
pencil
glue gun
glue sticks
1. Open any program you can type in like wordpad or even paint.net.
2. Choose your font. Make it as large as you want it. I used 300. Tape two pieces of paper together and trace your letter straight off the computer screen. This will be your template.
3. Using a cutting board and any knife. Starting at the center and working out. You can see I placed a full violet crayon and the second crayon was brown. Simply score the crayon lightly while turning it on the cutting board. It will easliy snap apart and give you a clean, nice edge.
4. Position all crayons on your template.
5. Now you're ready to place on your canvas. I used a 11x 16 canvas.
6. This parts a breeze. Transfer one at a time from your template to the canvas by glueing with your hot glue gun. (This way you have no pencil outlines on your canvas)
7. Once all crayons are glued you can quickly and I do mean quickly give it a quick blow with the blow dryer to get any loose gluestick strings off.
Options: I've seen these with the persons name in the the middle, or the meaning of their name, or even a picture of something starting with that letter painted onto the canvas. Personally, I like these plain for the playroom. Don't forget to sign your name and date it on the back!
That's it! My granddauther is 8 and she made one for her art teacher with no help at all from me!

No Sew Blankets
This is great for anyone!!

No sew fleece throw above. This also looks amazing with the back side having a contrasting bright color!

This fleece throw is sewn together because I used a more plush fleece. The plush fleece is SO soft!

This one is in the making. I feel in love with this fleece print. It's so different!
This one is oversized at 72" x 60". If you have never sewn or dont have access to a machine these no sew throws are so very simple to create! This one being oversized will take a total of approx 3 hours. I can't stand for long periods so I do the cutting at the ironing board then stretch them out on the floor and start tying while watching TV. lol!
Follow this link for a great how to: No Sew Fleece Blanket
for a video follow this: Video for No Sew Fleece Blanket
Have fun creating!
Creating a digital image!

Have you heard of Picnik.com?
If you need a poster or a picture edited this is a free and very easy site to visit!
You can upload 5 pictures at a time for free. Edit them then save to your computer!
If you need a picture or poster for lets say an event that you are sharing via Facebook begin by opening Picnik.com. Next click the library link, then click collage, on the far left hand side under basic I chose the 4 square grid. I then scrolled down and changed my grid to a solid black background. Now, click done. It will take you to a screen to begin creating your poster. There are stickers, frames, editing tools if you uploaded a photograph and a variety of fonts! Have fun creating and remember to save your image to your computer as a .jpg file.
Their membership is so very reasonable and opens up all sorts of extra editing and creating tools to play with! Enjoy!
Photo Editing


This is an example of photo editing in Picnik.com.

This is the final image.
This is the easiest photo editing site I've come across for a beginner.
There are also tutorials groups and help for Picnik, Photoshope and Paint.net at Cafemom.com!
Digital "Tags" by Bri


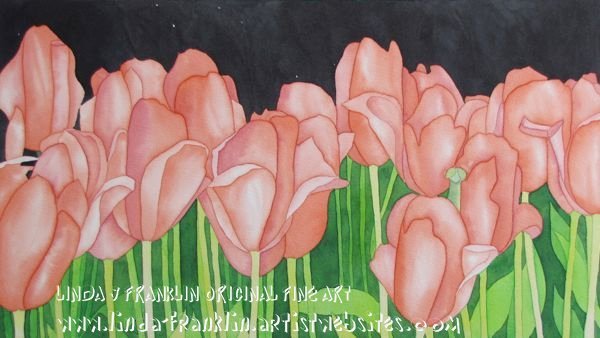
Paint my Photo.ning
This is an amazing site where photographers meet artist!
The artist chooses the photograph they want to paint with the photographers permission!
I love submitting photographs to these artist!

artist Linda Franklin chose my photograph above to use as her subject for her watercolor painting!
What an honor!
and
My dads 32 Hot Rod turned into this by Artist Ronnie Tucker.
Check out the fine details, the reflection of my sons Ford Expedition!

My dads 32 Hot Rod turned into this by Artist Ronnie Tucker.
Check out the fine details, the reflection of my sons Ford Expedition!

how about another one?

This one is my favorite barn to photograph here in Middle Tennessee! I find it so soothing and peaceful!
Kuddos to Artist Shirley Seputs for creating this perfectly! It's als


This was so easy! Now that we've created one I've learned a few pointers to pass on.
Items Needed
11x 14 Canvas (any size is okay)
box of 64 Crayons
glue gun
glue sticks
hairdryer
1. Line up you crayons in whatever order you like
2. One at a time simply glue each crayon down
3. Here's the tricky part. When using the hairdryer turn it on high and point it directly at the canvas, approx. 4-5 inches higher. Try not to wiggle it all around or you'll get the smears we got. However...we thought the smears were also kind-a cool. It takes about 10 minutes before you'll see the melting process begin.
4. Continue to heat and melt the crayons until you've reached the amount of "dripping" you like. As you can see we let our run off of the canvas.
**My 8 year old granddaughter made this with me. We're also planning on making one for her art teacher and use only her schools colors on a smaller canvas. ( yep...she's got the creative gene! )
***It's said you can sit this out in the sun on a hot summer day and let the sun do the melting!***
Happy Creating!
Jaylen and Meme
Welcome Baby Diaper Wreath

This is one of the easiest diaper creations I've made!
Items Needed
Box of Size 2 Diapers
3 foot piece of foam pipe insulation from Home Depot
*(this cost me .69 a foot, much cheaper than a styrofoam wreath)
Rubber-bands (21)
Ribbon (21-12" strands)
Items to decorate wreath
(I used the butterflies based off the baby's nursery)
Elmer's glue
or
Aleenes Tacky Glue (found at Michael's for .99)
Masking Tape or Duct Tape
Scissors
1. Tape the 3' piece of foam rubber together to form a circle
2. Begin by taking one diaper at a time and simply "wrapping" it around the foam. The foam will be sitting where babies bottom normally would.
3. Place rubber-band around the diaper to hold it in place
4. Continue to do this all the way around until you've filled up the circle. Gently push them together and "shape" your wreath. By doing this you may fit in another diaper or two.
5. Next you're going to be replacing each of the rubber-bands with a piece of ribbon. Do this on all of the diapers.
6. Curl your ribbon with your scissors
7. Gently glue on any letters or items you want to decorate with
(I use Elmer's or Aleens because they are Non-Toxic)
8. I have used fishing line or elastic cording to tie on heavy items such as a baby-doll or stuffed elephant.
This is a great idea to take to the hospital for welcoming baby!
No comments:
Post a Comment